How To Inspect A Used Car Before Buying In UK Pro Checklist
Master how to inspect a used car before buying with our pro checklist. Learn to spot hidden damage, test mechanical health, and verify essential paperwork.

How To Inspect A Used Car Before Buying In UK Pro Checklist
Buying a used car is one of the biggest purchases most people make outside of property, and yet thousands of UK buyers hand over their money each year without doing proper due diligence. Some end up with a vehicle hiding serious mechanical faults, while others discover too late that their car has outstanding finance or a hidden write-off history. Knowing how to inspect a used car before buying is the single most effective way to protect yourself from expensive mistakes.
The good news is that you don't need to be a mechanic to carry out a thorough inspection. You need a systematic approach, a clear checklist that covers everything from bodywork and tyres to engine health, electrics, paperwork, and the all-important test drive. That's exactly what this guide provides.
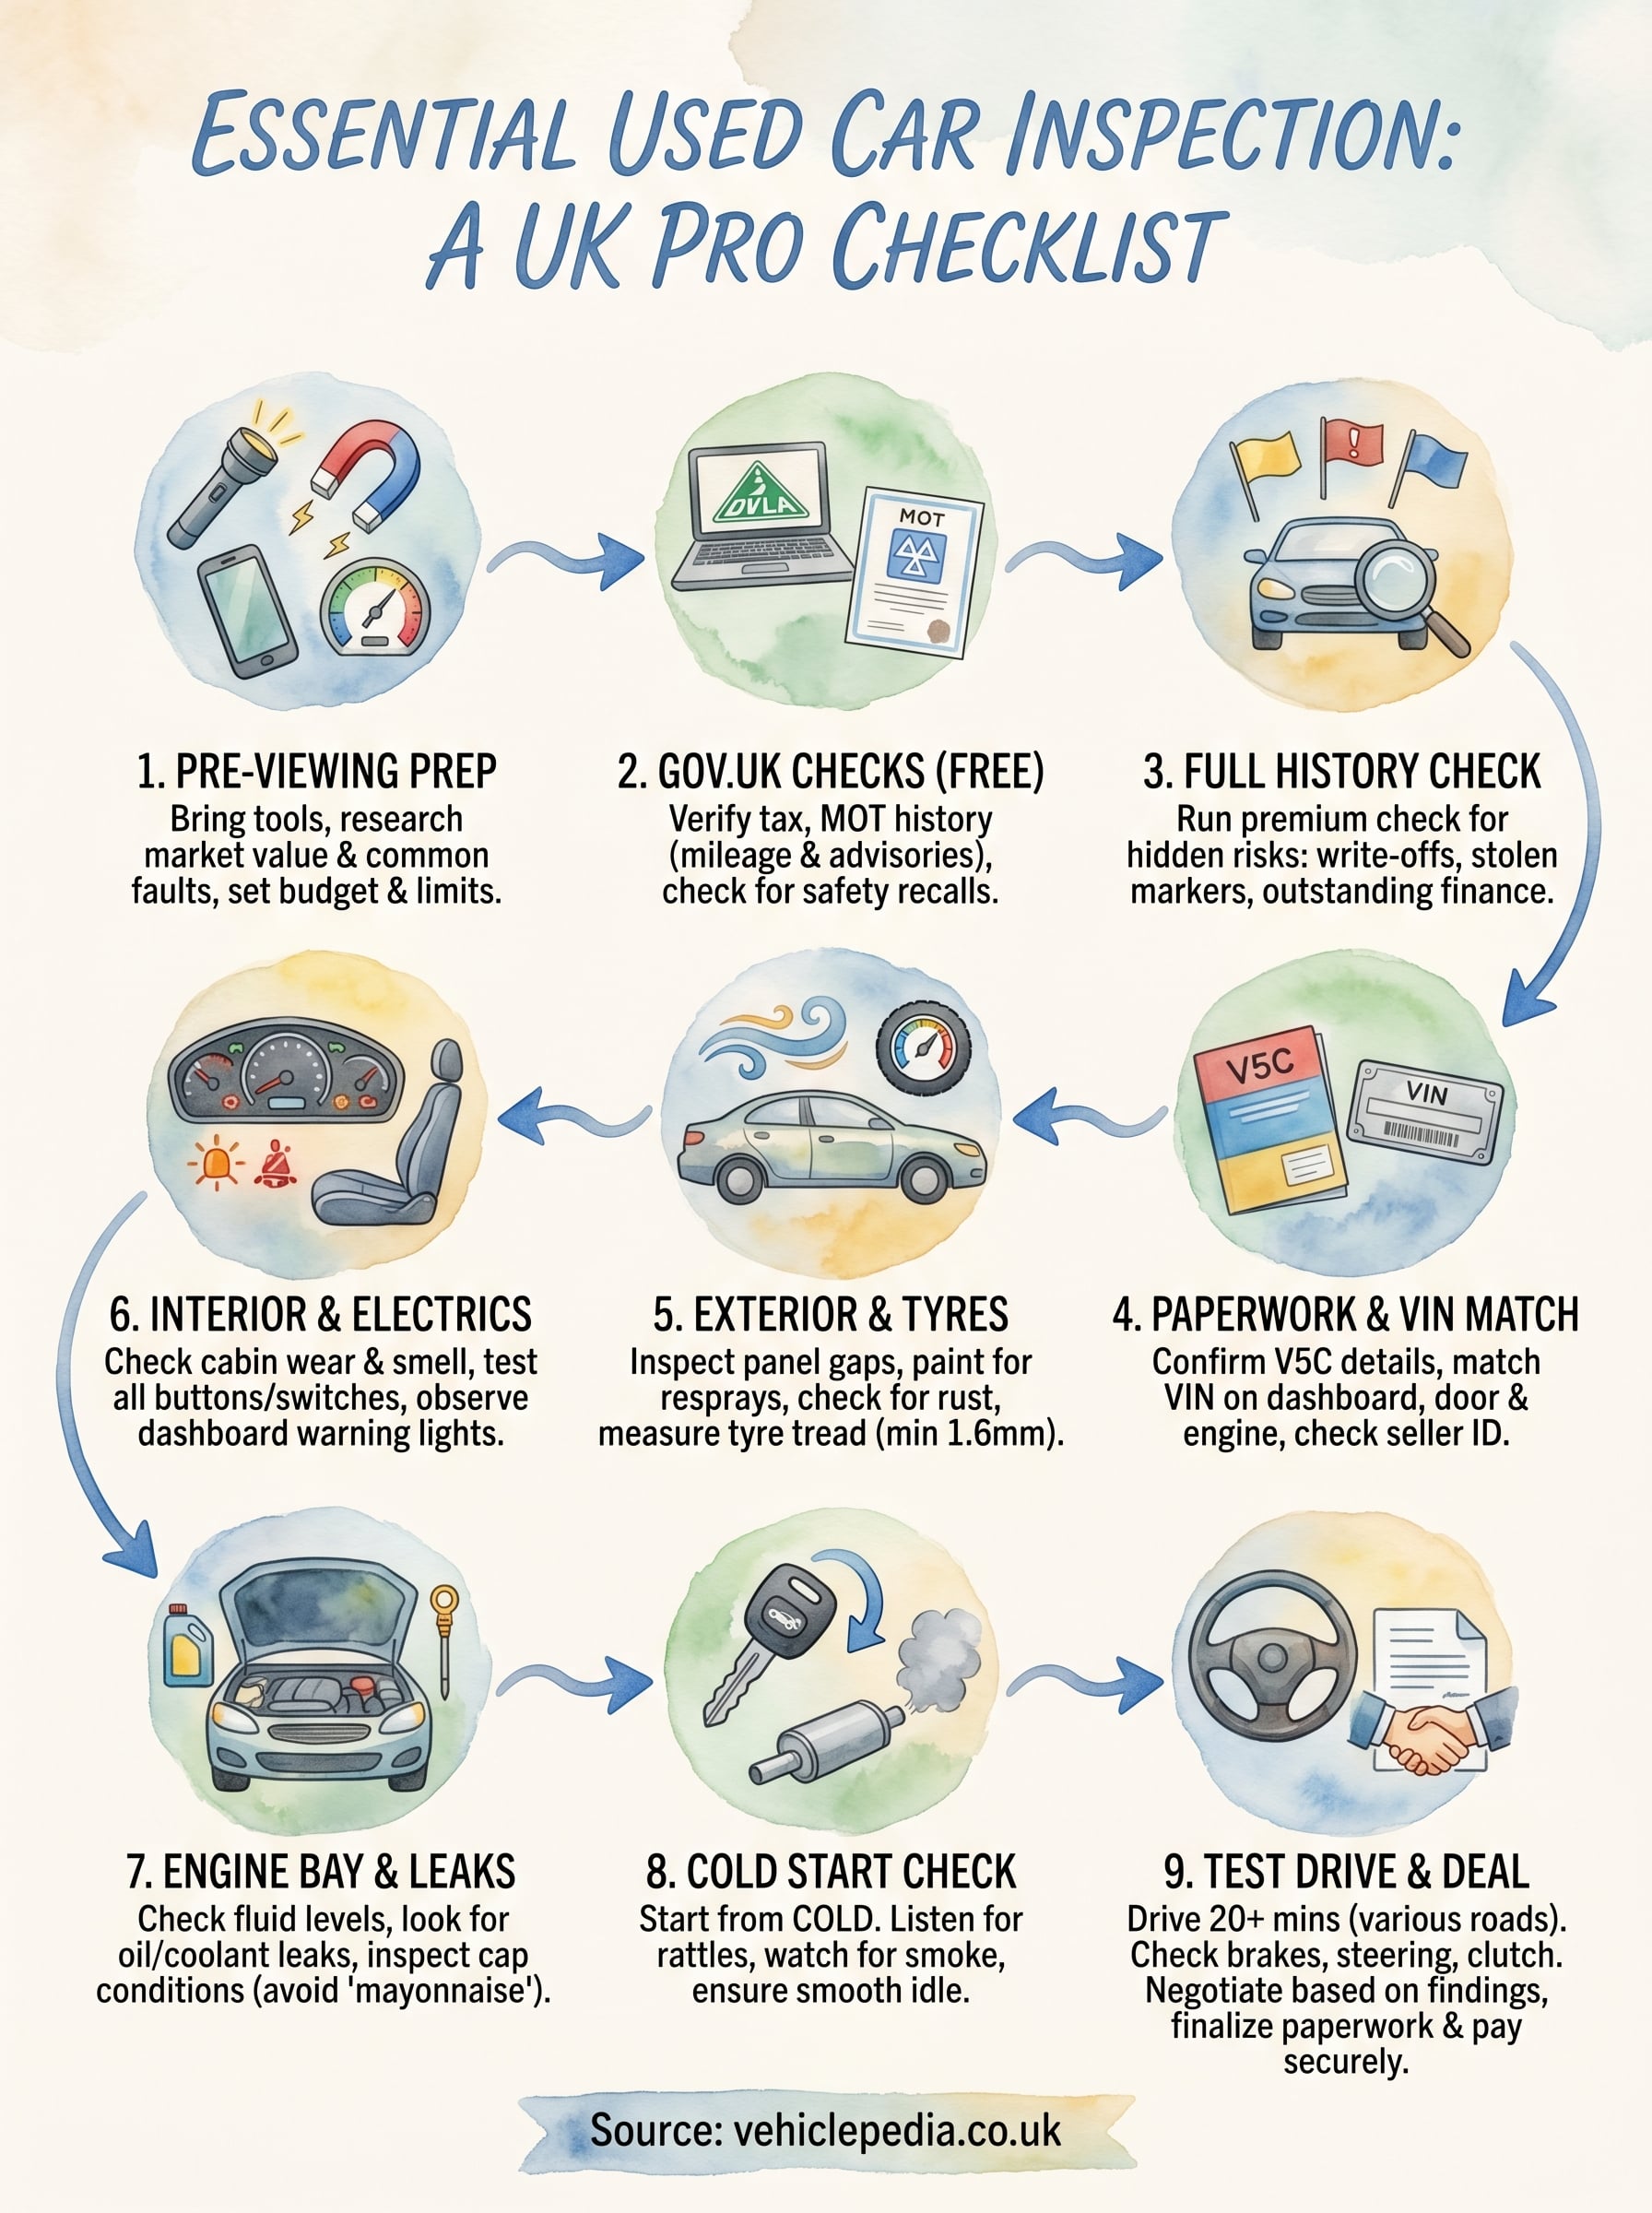
Below, you'll find a detailed, step-by-step checklist covering every physical, mechanical, and administrative check worth doing before you commit to a purchase. We've also included guidance on running a vehicle history check through Vehiclepedia, where you can verify a car's MOT history, tax status, ownership records, and more using just the registration plate, with premium checks available for write-off, stolen, and finance flags. Armed with this information, you'll be in a far stronger position to spot problems, negotiate confidently, and buy with peace of mind.
What you need before you view a car
Preparation is everything when learning how to inspect a used car before buying. Turning up to a viewing without the right tools or background information puts you at an immediate disadvantage - you'll miss things you should catch and have no reliable baseline to compare against what the seller tells you. Spending 30 to 60 minutes getting organised before you leave home, and gathering key facts about the specific vehicle, can save you thousands of pounds later.
The tools and equipment to bring
Most of the useful checks you can do require nothing exotic. A phone with a working torch is arguably the most important item - you'll need it to peer under the car, into the engine bay, and into corners of the boot where rust hides. A few low-cost additions make a significant difference to what you can actually verify on the day.
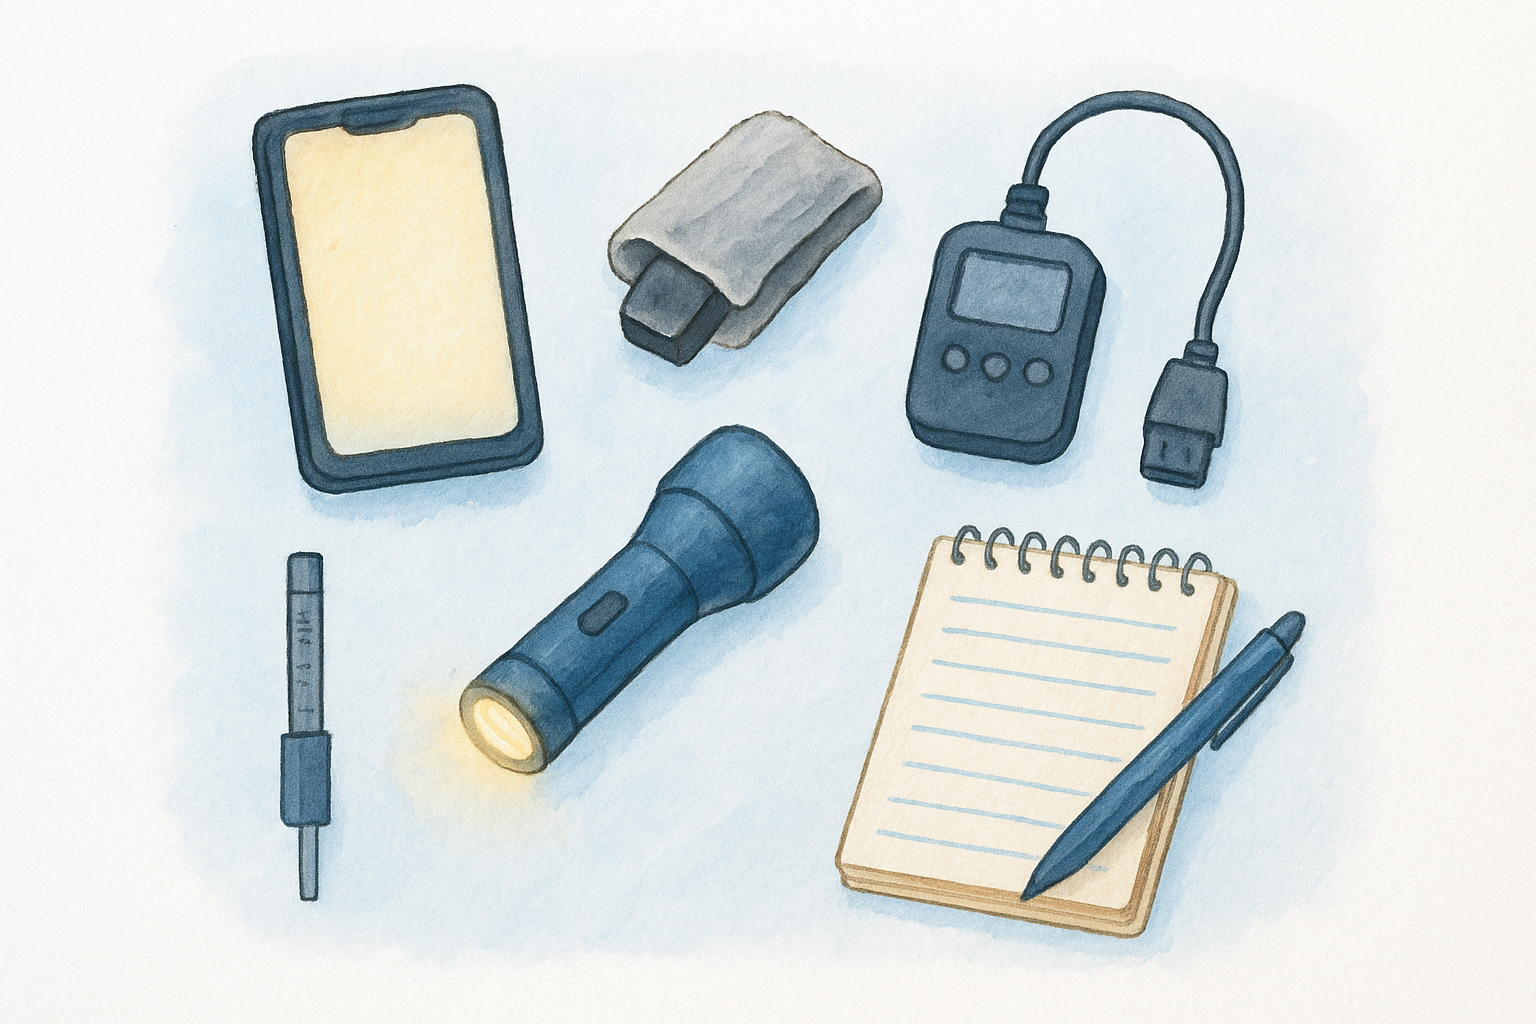
Here's what to bring with you:
- Torch (or phone torch) - for checking under the vehicle, inside wheel arches, and around door seams
- Small magnet wrapped in cloth - to detect body filler hidden beneath a respray without scratching the paint
- OBD2 scanner - a basic Bluetooth model costing around £15 to £25 plugs into the car's diagnostic port and reads any stored fault codes; pair it with a free app on your phone before you go
- Tyre tread depth gauge - cheap, widely available, and removes guesswork when checking whether tyres are legal (the UK minimum is 1.6mm across the central three-quarters of the tread)
- Notepad or phone notes app - to record the mileage, VIN, and any faults you spot during the inspection
- A trusted second person - ideally someone with mechanical knowledge, but even a calm, observant friend is useful
Bringing someone else with you also acts as a social buffer, making it far easier to slow down, ask questions, and take your time without feeling pressured by the seller.
The information to research before you go
You should never arrive at a viewing knowing only the price and the photos from the advert. Researching the vehicle in advance means you can spot inconsistencies the moment you arrive, and you'll know exactly what questions to ask. At minimum, you want to know the market value, the model's common failure points, and the car's official record with the DVSA.
Gather the following before you contact the seller:
| What to check | Where to find it | Why it matters |
|---|---|---|
| Market value | Parkers price guide, Auto Trader | Confirms whether the asking price is realistic |
| Common faults for that model | Owners' clubs and manufacturer forums | Tells you exactly where to focus during the inspection |
| MOT history | DVSA's free MOT history tool on GOV.UK | Reveals recurring failures, advisories, and recorded mileage |
| Recall status | DVSA recall checker on GOV.UK | Confirms whether any open safety recalls are still outstanding |
| Tax and basic DVLA data | GOV.UK vehicle enquiry service | Checks the car is currently taxed and matches the advert details |
Once you have the registration number, run a free vehicle check on Vehiclepedia to confirm the car's tax status, MOT expiry date, and DVLA records before you even pick up the phone. This takes under a minute and immediately flags anything obviously wrong, such as a car advertised as taxed that the DVLA shows with no current tax.
Setting your limits before you arrive
Decide on your maximum budget and your walk-away criteria before you set off, not after you've sat in the car and started to like it. Write down the top three faults that would make you leave regardless of price - for example, evidence of a structural accident repair, an outstanding finance marker, or a VIN plate that doesn't match the V5C. Having these firm limits written down in advance keeps emotion out of the decision when you're standing in front of the car and the seller is being friendly.
Step 1. Check DVLA details, MOT history, and recalls
Before you step foot near the car, you should already have verified its official record with the DVLA and DVSA. This is the fastest way to catch outright lies in the advert - things like a misrepresented mileage, a car listed as taxed that is actually on SORN, or a vehicle with an open safety recall the seller hasn't mentioned. Running these checks costs you nothing, takes under five minutes, and gives you a reliable baseline to compare against everything the seller tells you during the viewing.
Use the free government tools
Three separate tools on GOV.UK give you the core official data you need before viewing any used car. Each one is free, requires only the registration plate, and pulls directly from official government databases. Use all three before you even contact the seller.
| Tool | What it tells you |
|---|---|
| Vehicle enquiry service | Tax status, MOT expiry date, make, colour, and engine size |
| MOT history check | Full pass/fail record, advisories, and recorded mileage at each test |
| Recall checker | Any outstanding manufacturer safety recalls for that registration |
You can find all three tools on GOV.UK.
Read the MOT history carefully
The MOT history is one of the most underused resources available when learning how to inspect a used car before buying. Each entry shows the recorded mileage at the time of the test, which means you can build a complete mileage timeline going back several years. If the mileage appears to go backwards or stays suspiciously flat between tests, that is a strong indicator of clocking - illegal odometer tampering - and a clear reason to walk away.
Pay close attention to repeated advisories across multiple MOT years; they point to ongoing neglect rather than isolated, one-off issues.
Look for patterns across the full history, not just the most recent result. A car that passes every year but carries persistent advisories on brake components, tyre condition, or suspension joints is signalling that the previous owner routinely deferred maintenance. That backlog of deferred work becomes your financial problem the moment you hand over the money.
Check for open safety recalls
An outstanding recall means the manufacturer has identified a safety-critical defect that has not yet been repaired. Some recalls are minor software updates, but others cover braking systems, fuel lines, or steering components - faults that directly affect your safety on the road. If the recall checker flags an open issue, ask the seller to confirm the repair has been completed and request the official paperwork from the franchised dealership that carried it out. A seller who cannot produce that paperwork has not had the recall work done.
Step 2. Run a full history check for hidden risks
The government tools covered in Step 1 tell you whether a car exists in official records and has a clean MOT trail. They won't tell you whether the car has been written off in an accident, whether it's currently flagged as stolen by the police, or whether a previous owner took out finance against it that still hasn't been settled. That's where a full vehicle history check fills the gap, and it's a non-negotiable part of knowing how to inspect a used car before buying.
What a full history check reveals
A comprehensive history check pulls data from sources that the free government tools don't touch, including insurance write-off registers, the UK Police National Computer, and finance and lending databases. Running one through Vehiclepedia before your viewing gives you a clear picture of the car's past before you've spent time or money travelling to see it.
The three hidden risks that catch UK buyers out most often are:
- Write-off status: A car categorised as Category S or N has been declared a total loss by an insurer. Cat S indicates structural damage. Cat N indicates non-structural damage. Both can be legally repaired and sold, but the value is significantly reduced and repair quality varies enormously.
- Stolen vehicle flag: Buying a stolen car means the police can seize it from you with no financial compensation. A check against the Police National Computer is the only reliable way to confirm the car isn't recorded as stolen.
- Outstanding finance: If a previous owner borrowed money against the car and hasn't repaid it, the finance company retains a legal interest in the vehicle. That debt follows the car rather than the seller, meaning the lender can legally recover it from you after purchase.
Buying a car with outstanding finance is one of the most common and expensive mistakes UK used car buyers make, and a history check is the only way to catch it before it becomes your problem.
How to interpret your results
Once you receive your report, work through each section methodically before you respond to the seller. If the report shows a clean result across all markers, you can move forward to the physical inspection with confidence. If it flags any issue, treat it as a firm stop point until the seller provides a full written explanation and supporting paperwork.
| Result | What it means | Recommended action |
|---|---|---|
| Clean | No flags across write-off, stolen, or finance checks | Safe to continue with the physical inspection |
| Write-off (Cat S or N) | Car declared a total loss at some point | Request full repair documentation; adjust your offer accordingly |
| Stolen flag | Car recorded as stolen on police database | Walk away immediately |
| Outstanding finance | Lender holds a legal interest in the vehicle | Do not purchase until finance is confirmed settled in writing |
Step 3. Verify the seller, V5C, and VIN match
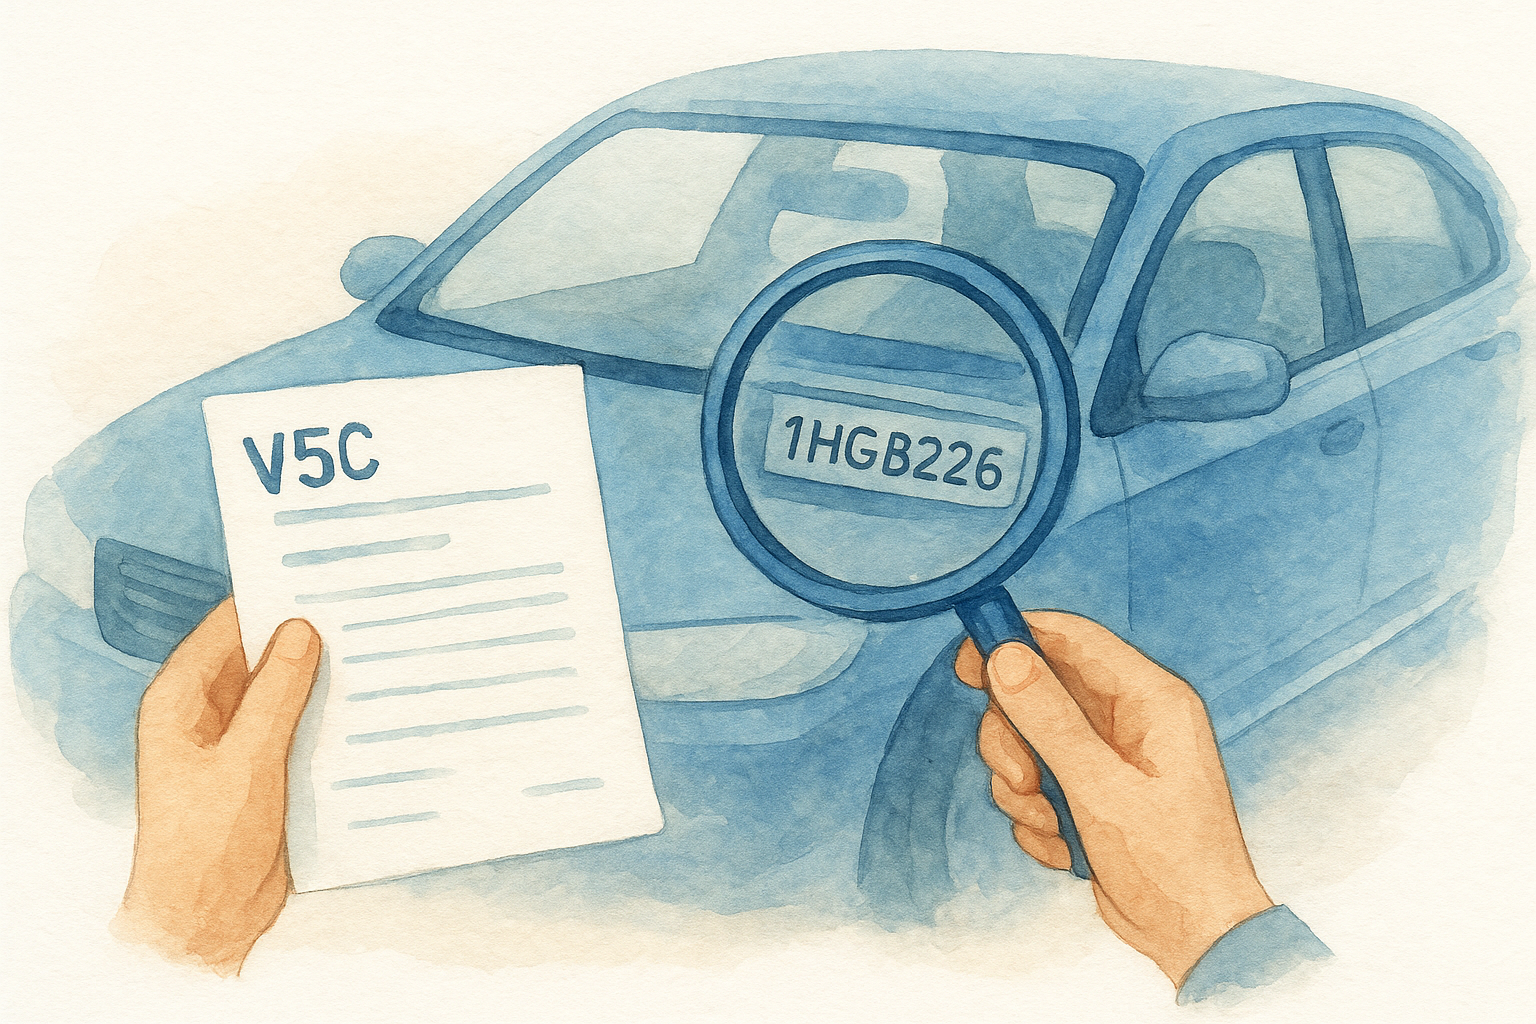
A genuine car with a clean history check still needs one more layer of paperwork verification before you proceed to the physical inspection. Sellers can misrepresent ownership, present altered documents, or sell a car they have no legal right to sell. Verifying the V5C logbook, the Vehicle Identification Number (VIN), and the seller's identity takes less than 15 minutes on the day of the viewing, and it's one of the most important steps when learning how to inspect a used car before buying.
Check the V5C logbook in detail
The V5C is the official registration document issued by the DVLA, and it records the registered keeper's name and address alongside the vehicle's make, model, colour, and engine size. Ask to see it before you even look at the car. A seller who hesitates to hand it over immediately is worth treating with serious caution.
Work through each field and compare it against the advert and your earlier DVLA checks:
- Registered keeper's address must match the address where the car is being sold; if the seller says they're selling on behalf of a friend, walk away
- Vehicle details including make, colour, and engine size must match the car in front of you
- Number of previous keepers gives you useful context on the car's ownership history
- Date of first registration confirms the car's age matches what the advert claimed
A V5C with spelling corrections, smudged ink, or a missing perforated document number is a serious warning sign - contact the DVLA to verify its authenticity before going any further.
Locate and cross-check the VIN
The Vehicle Identification Number is a 17-character code unique to that specific car. You'll find it in three places: stamped into the metal plate on the dashboard visible through the windscreen on the driver's side, on a plate inside the driver's door frame, and sometimes on the engine block. All three locations should match each other exactly and match the VIN printed on the V5C.
Any mismatch between VIN locations points strongly to a cut-and-shut vehicle, where two accident-damaged cars have been welded together into one. This is dangerous structurally and illegal to sell without full disclosure to the buyer.
Confirm the seller's identity
Ask the seller to show you photo ID such as a driving licence or passport and confirm that the name matches the registered keeper recorded on the V5C. Private sellers should always be selling from their own home address. If the car is parked on a public street or in a car park rather than a private driveway, ask why and treat any vague explanation as a red flag.
Step 4. Inspect the exterior, tyres, and signs of repairs
The exterior of a car tells a story that the seller may not volunteer. Paint inconsistencies, uneven panel gaps, and mismatched tyre wear all point to problems that would otherwise stay hidden until after you've paid. Knowing how to inspect a used car before buying means treating the bodywork as a source of information, not just an aesthetic concern.
Start with a walk-around at distance
Begin by standing 10 to 15 feet back from each corner of the car and looking along each panel in turn. Do this in daylight rather than artificial light - shadows in a garage or dim car park make surface repairs nearly invisible. You're looking for ripples, dimples, or colour variations across the bonnett, doors, wings, and boot lid that suggest previous accident damage or a respray.
A car that has been repainted on one panel following an accident will almost always show a slightly different shade or texture compared to the original factory paint when viewed in natural daylight at an angle.
Check panel gaps, paint, and body filler
Move closer and run your fingers along each door and panel gap. Gaps should be even and consistent all the way around each door, the boot, and the bonnett. Wide or uneven gaps on one side but not the other point directly to a structural repair or a replacement panel fitted after an accident. Use your cloth-wrapped magnet on each panel - the magnet loses grip over body filler, which is used to hide dents and repair damage cheaply. Any panel where the magnet barely sticks is hiding something.
Check the door sills and wheel arches closely with your torch, as these are the areas most likely to show surface rust or bubbling paint from the inside outward. Minor surface rust can be treated; rust that has broken through the metal surface requires significant repair work.
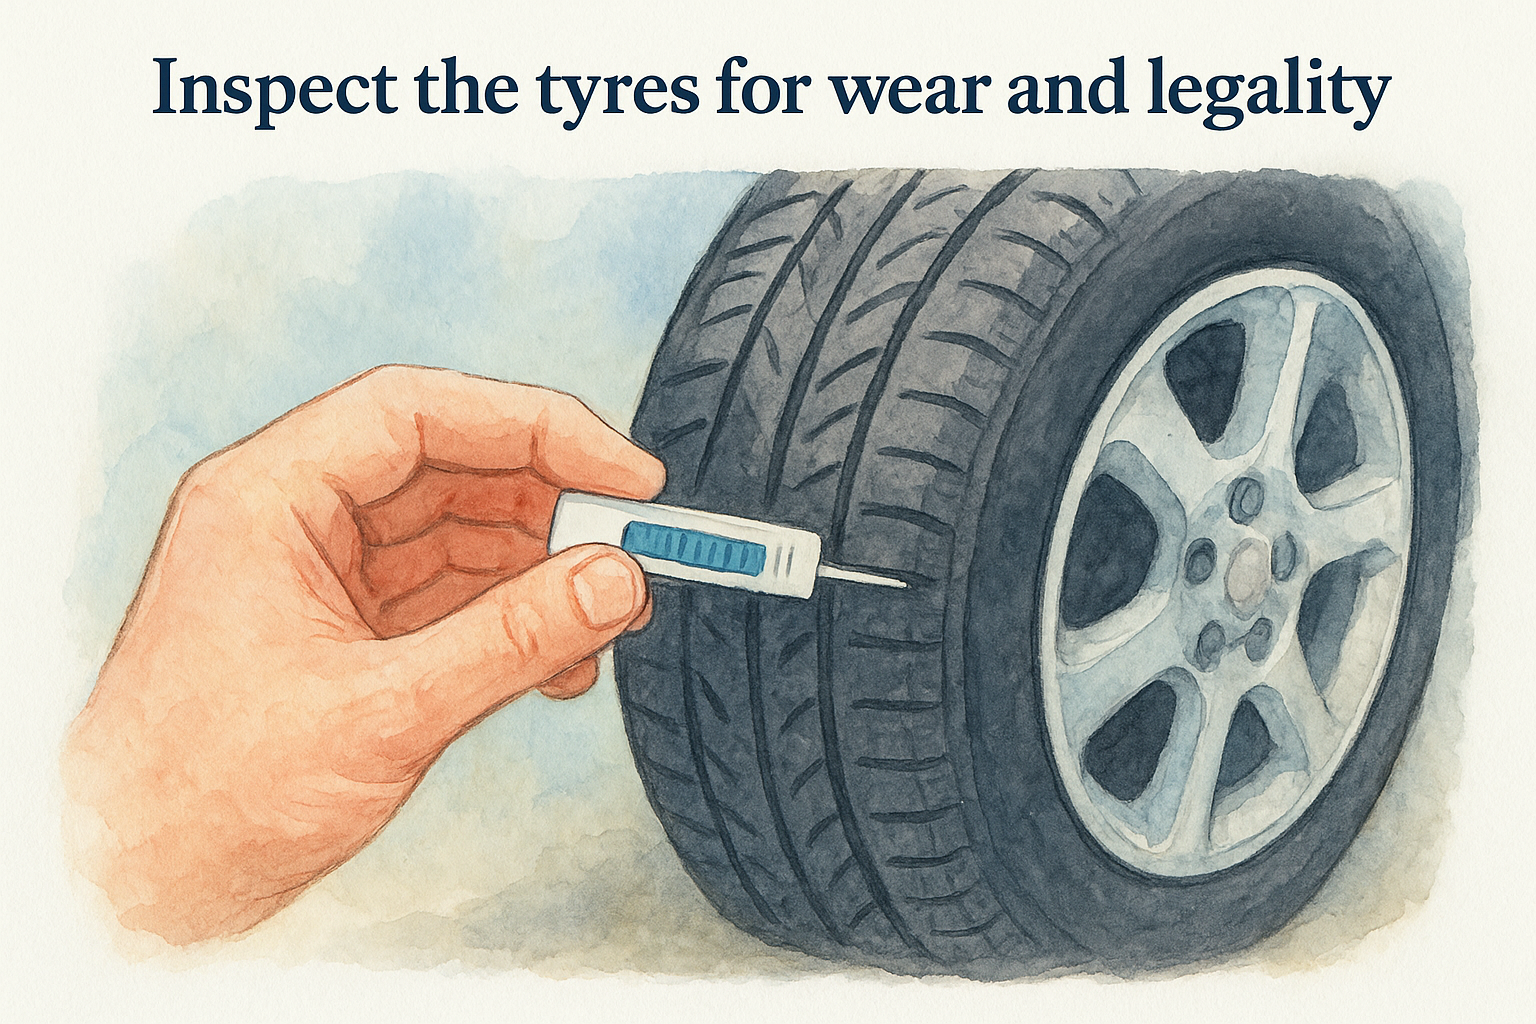
Inspect the tyres for wear and legality
Use your tread depth gauge on all four tyres, measuring at the centre and both edges of each tyre. UK law requires a minimum of 1.6mm across the central three-quarters of the tread. Worn edges on an otherwise deep-treaded tyre suggest an alignment or suspension problem rather than simply age. Also check that all four tyres are the same brand and specification - a mismatched set indicates the car has not been maintained consistently.
| Check | What to look for |
|---|---|
| Tread depth | Minimum 1.6mm across central three-quarters |
| Edge wear | Worn edges suggest alignment or suspension fault |
| Matching tyres | All four should match in brand and size |
| Sidewall condition | No cracks, bulges, or cuts visible |
Step 5. Check the interior, electrics, and warning lights
The interior gives you a direct read on how a car has actually been used, not how the seller describes it. A seller can clean the bodywork thoroughly before a viewing, but worn seat bolsters, a cracked dashboard, and stained carpets are much harder to hide and much harder to fake. Part of knowing how to inspect a used car before buying is treating the cabin as evidence of real-world use, because it shows you the truth about a car's history faster than almost anything else.
Inspect the cabin condition and smell
Sit in the driver's seat and passenger seat in turn and look at the wear across both. High mileage leaves clear signs on the driver's seat base and bolster, on the steering wheel leather at the nine and three positions, and on the driver's footwell carpet around the pedals. If any of these areas look unusually fresh while the rest of the interior looks well-used, the odometer reading deserves scrutiny.
Pay attention to smell as well as sight. A strong air freshener inside the car often masks damp, mould, or oil. Roll down the windows, turn off any fragrance, and sniff the boot carpet and under the rear seats specifically. Persistent damp smell indicates water ingress, which causes lasting electrical and structural damage.
Lifting the boot carpet to check the spare wheel well is one of the most reliable ways to find flood damage, because that area retains water long after the rest of the car has been dried out.
Test every electrical component
Work through the car's full electrical system methodically rather than just trying the radio. Budget around ten minutes for this step, because faulty electronics are expensive to diagnose and repair.
Use the following checklist on every viewing:
- All electric windows - operate each one fully up and down
- Central locking - test from both the key fob and the internal switch
- Heated seats and heated rear window - confirm both warm up within 60 seconds
- All interior and exterior lights including indicators, fog lights, and reversing light
- Air conditioning - run it on full cold for two minutes to confirm it produces cold air
- Infotainment screen - check Bluetooth pairing, touchscreen response, and reverse camera if fitted
Read the warning lights correctly
Start the engine yourself from cold with the ignition off first. When you turn the ignition to position two before starting, every warning light on the dashboard should illuminate briefly as a bulb check, then extinguish when the engine fires. Any light that stays on after start-up indicates an active fault. An ABS, airbag, or engine management light that remains lit is not a minor issue and deserves a diagnostic read before you go any further with the purchase.
Step 6. Inspect the engine bay for leaks and neglect
Most buyers glance at the engine, see something metallic, and move on. That approach misses some of the most expensive problems a used car can hide. Knowing how to inspect a used car before buying properly means spending five to ten minutes in the engine bay methodically, because what you find there tells you far more about how the car has been maintained than any service history document ever could.
Look before you touch anything
Ask the seller to pop the bonnet while the engine is completely cold - you'll see shortly in Step 7 why a cold start matters, but the engine bay inspection itself should always come before the car has been warmed up. With the bonnet open, stand back and scan the entire bay from one side to the other before reaching in. You're looking for general cleanliness versus obvious neglect, and for any immediate signs of leaking fluid.
A freshly steam-cleaned engine bay can hide recent leaks, so treat an unusually spotless engine with the same caution as a visibly dirty one.
Identify common leak sources
Dark brown or black sludge on the underside of the rocker cover or around the cam belt housing points to an oil leak. Coolant leaks often leave a crusty, dried residue that looks white or orange around the radiator, coolant hoses, or the coolant reservoir. Even minor leaks indicate seals or gaskets that are deteriorating, and in some engines that repair is straightforward while in others it requires significant labour.
Look at the coolant hoses specifically. Soft, spongy, or cracked rubber on any coolant hose suggests it's overdue for replacement, and a failed coolant hose on the road results in an overheated engine within minutes.
Check fluid levels and cap conditions
Remove each dipstick and reservoir cap in turn and check what you find. Engine oil on the dipstick should sit between the minimum and maximum markers and appear a clean amber colour rather than a thick black sludge. Dark oil that has clearly not been changed recently indicates poor maintenance habits across the car's life.
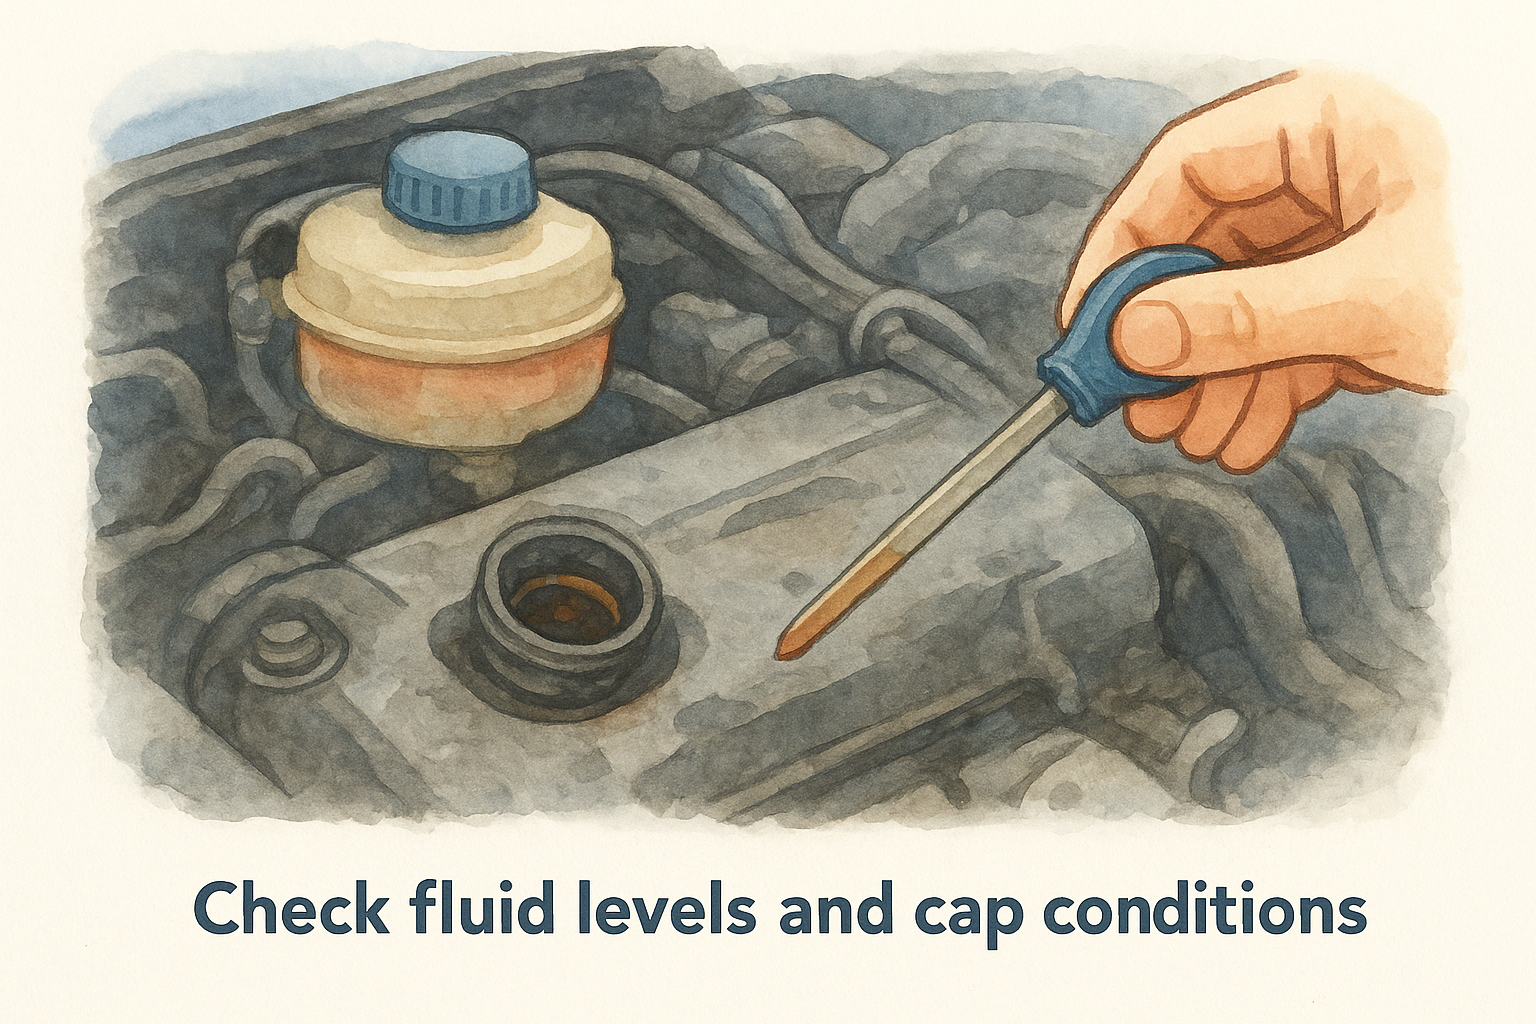
Lift the oil filler cap and look inside. A creamy, mayonnaise-like residue on the underside of the cap is a serious warning sign pointing to a blown head gasket, where coolant is mixing with oil. This repair runs into thousands of pounds on most engines and is a firm reason to walk away.
Step 7. Do a cold start check before you drive
A cold start is one of the most revealing moments in the entire inspection, and it costs you nothing extra to do. When an engine fires from completely cold, it tells you things about the car's mechanical condition and maintenance history that no seller can hide with a quick clean or a fresh air freshener. This step is a core part of knowing how to inspect a used car before buying, and skipping it removes one of your best opportunities to catch serious mechanical problems before they become your problem.
Ask the seller not to warm the engine beforehand
Contact the seller before you visit and ask them directly to leave the car completely cold on the day of your viewing. Do not start the car yourself before the engine has sat cold for several hours, ideally overnight. A warm engine starts quietly and cleanly, which makes it far easier for a seller to hide difficult cold-start symptoms such as rough idling, excessive smoke, or a loud rattle in the first few seconds after ignition.
If you arrive and the bonnet is already warm to the touch, treat that as a deliberate attempt to conceal something and ask the seller plainly why the car has been running.
What to watch and listen for during start-up
Stand outside the car when you turn the key or press the start button. Watch the exhaust pipe from the moment the engine fires for the first 30 seconds, because that window reveals the most information. Use the following checklist to assess what you see and hear:
- Blue or grey smoke from the exhaust - indicates the engine is burning oil, which points to worn piston rings or valve stem seals
- White smoke that clears within 30 seconds - normal condensation on a cold morning in winter; white smoke that continues after warm-up points to a head gasket fault
- Loud rattling or tapping on first start - often a sign of a worn timing chain or low oil pressure, both of which are expensive repairs
- Rough idle that smooths out within a minute - minor fuel system issue; a rough idle that persists is a larger concern
- Warning lights that stay lit after start-up - confirm these against what you found in Step 5
Let the engine idle for at least two minutes before you move on to the test drive. Listen for any changes in sound as the engine warms, because some faults only appear once the oil begins to circulate through the system.
Step 8. Test drive to spot expensive problems
The test drive is where everything you've checked on paper and in the driveway either confirms or contradicts itself. This is the stage of how to inspect a used car before buying that most buyers rush through, and that's exactly where expensive problems stay hidden. Plan for at least 20 to 30 minutes on the road, including a mix of town driving, a faster A-road stretch, and at least one full emergency brake if the road conditions allow.
What to check before you pull away
Before you move the car, adjust the seat, mirrors, and steering column to a position that gives you full, natural control. You need to focus entirely on what the car is telling you during the drive, not on fighting an uncomfortable seating position. Check that the handbrake holds firmly on a slope before you release it, as a weak handbrake signals worn rear brakes or a stretched cable.
A seller who tries to limit your test drive route, keeps the radio on throughout, or talks constantly during the drive is making it harder for you to hear the car properly - and that warrants asking yourself why.
Listen and feel during the drive
Pull away slowly at first and notice whether the clutch bites smoothly at a consistent point, or whether it grabs high up the pedal or slips under load. Both suggest the clutch is worn and nearing replacement, which costs upwards of £500 on most cars. As you build speed, take your hands off the wheel briefly on a flat, straight road and check whether the car pulls left or right, which indicates a wheel alignment or suspension fault.
Listen with the radio off throughout the drive. Knocking or clunking over speed bumps points to worn suspension bushes or drop links. A whining noise that changes pitch with road speed often indicates a failing wheel bearing - a repair that is straightforward but becomes dangerous if left.
Brakes, steering, and motorway speeds
Apply the brakes at various speeds and feel for juddering through the pedal, which points to warped brake discs. A pulling sensation to one side under braking suggests uneven pad wear or a sticking calliper. At higher speeds, check whether the steering wheel vibrates, as this usually indicates wheel balancing issues or a tyre fault. Both are cheap to fix, but they also confirm the seller has not maintained the car properly in recent months.
Step 9. Make a safe deal and drive away legally
Reaching this stage of how to inspect a used car before buying means you've done the hard work, and now you need to handle the final transaction correctly. A good inspection can still be undermined by a rushed or poorly documented deal. Every agreement you make verbally needs to be confirmed in writing before any money changes hands.
Negotiate based on evidence, not gut feel
Every fault you found during your inspection is a legitimate negotiating point, and you should use your notes directly when making a lower offer. Worn tyres, a service history gap, or a flagged advisory on the MOT history all have a real-world repair cost attached to them, and that cost belongs in your calculation.
Quoting a specific repair estimate rather than just asking for money off puts you in a far stronger position and shows the seller you've done your homework.
Use this simple template when making a written offer by message or email, so there is a clear record:
Hi [Seller name],

Following my inspection on [date], I'd like to offer £[amount] for the [make, model,
registration]. This reflects the following points noted during the viewing:

- [Fault 1] - estimated repair cost £[X]
- [Fault 2] - estimated repair cost £[X]

Please confirm acceptance in writing. I can arrange payment on [proposed date].

Thanks,
[Your name]
Sort the paperwork before you hand over money
Never pay before the V5C is in your hands and fully completed for the transfer. The seller fills in the relevant section and signs it over to you on the day of sale. Both of you should retain a copy of the receipt confirming the agreed price, the date, the registration plate, and the mileage at point of sale.
Pay by bank transfer rather than cash wherever possible, as this creates a traceable record that proves the transaction took place and protects you in any later dispute. Avoid paying in full before you've collected the car in person.
Drive away legally from day one
You must have valid motor insurance in place before you move the car a single metre on a public road. Arrange cover in advance using the registration plate, and confirm the policy start time matches when you plan to collect. If the car has no current MOT, you cannot legally drive it on public roads except to a pre-booked MOT appointment and only via the most direct route.
Check the tax status one final time on GOV.UK before you leave, confirming that the tax transferred correctly or that you've applied for your own. Road tax does not transfer between owners in the UK, so the seller's existing tax ends the moment the car changes hands.
Ready to buy or walk away
You now have everything you need to know about how to inspect a used car before buying in the UK. Work through the checklist in order, and by the time you reach the test drive and paperwork stage, you'll have a clear, evidence-based picture of exactly what you're dealing with. Every step you skip is a potential problem you discover after the money has already left your account.
Walking away from a car that doesn't stack up is not a failure. It's the point of the whole process. The right car, checked properly, should give you complete confidence at every stage from the first history search through to the final handover.
Before you even arrange a viewing, start with a full vehicle history check to catch any hidden risks early. Check a car's full history on Vehiclepedia and see exactly what a premium report covers before you commit.